#network #tcpip #portscan #recon
Scan for all the hosts on the 192.168.178.0/24 network:
nmap -sP 192.168.178.0/24
Scan for all the host with #port554 ( #rtsp) (This can be a webcam)
``nmap -sT -p 554 192.168.2.0/24``
If you see port 554 which is closed, there is no actual service running on it. When it is open, this port can be interesting ;-)
```
PORT STATE SERVICE
554/tcp open rtsp
```
To see ONLY the hosts with this port open:
``nmap -sT -p 554 --open 192.168.2.0/24``
Using the -v option, will enable **verbose mode**, which provides **more detailed output** during the scan, which helps in understanding the scanning process and reveals additional information about the target system.
``nmap -v [target IP or domain]``
If you only want to list the ipadresses who have open ports, you can use this command. This one is also handy when you like to pipe the ipadresses to another command:
``nmap -sT -p 554 --open -oG - 192.168.2.0/24 | awk '/open/{print $2}'``
``nmap -sT -p 554 --open -oG - 192.168.2.0/24 | grep '/open/'`` Could also work, but you will get the complete line, in sted of column 2 ( in awk)
Alternative #rtsp ports scan:
``nmap -sT -p 554,8554,10554,1554,7070 --open 192.168.2.0/24``
#udp #rtsp ports scan:
``sudo nmap -sSU -p T:554,U:554 --open 192.168.2.0/24``
If you like to use a script to scan for ways to see the rtsp stream:
``nmap -sT -p 554 --open -sV --script rtsp-methods,rtsp-url-brute 192.168.2.0/24``
More [Nmap scripts](https://securitytrails.com/blog/nmap-scripts-nse "Nmap scripts")
You can also scan **consecutive IP addresses**:
``nmap 1.1.1.1,2,3,4``
**Scan specific ports or scan entire port ranges** on a local or remote server
``nmap -p 1-65535 localhost``
If you ever need to exclude certain IPs from the IP range scan, you can use the “–exclude” option, as you see below:
``nmap -p 8.8.8.* --exclude 8.8.8.1``
Using “–top-ports” parameter along with a specific number lets you scan the top X most common ports for that host, as we can see:
``nmap --top-ports 20 192.168.1.106``
Let’s suppose you create a list.txt file that contains these lines inside:
```
192.168.1.106
recordedfuture.xyz
securitytrails.xyz
```
The “-iL” parameter lets you read from that file, and scan all those hosts for you:
``nmap -iL list.txt``
**Scan + OS and service detection with fast execution**
Using the “-A” parameter enables you to perform OS and service detection, and at the same time we are combining this with “-T4” for faster execution. See the example below:
```nmap -A -T4 securitytrails.xyz```
This is the output we got for this test:
![[Pasted image 20251021230448.png]]
Detect service/daemon versions
This can be done by using -sV parameters
``nmap -sV localhost``
**CVE detection using Nmap**
One of Nmap’s greatest features that not all the network and systems administrators know about is something called “Nmap Scripting Engine” (known as [NSE](https://nmap.org/book/nse.html "NSE")). This scripting engine allows users to use a pre-defined set of scripts, or write their own using Lua programming language.
Using [Nmap scripts](https://securitytrails.com/blog/nmap-scripts-nse "Nmap scripts") is crucial in order to automate system and vulnerability scans. For example, if you want to run a full vulnerability test against your target, you can use these parameters:
``nmap -Pn --script vuln 192.168.1.105``
**Flood testing with Nmap**
Nmap features never seem to end, and thanks to the NSE, that even allows us to launch flood attacks against our network to test how effective our mitigation methods are.
``nmap 192.168.1.105 -max-parallelism 800 -Pn --script http-slowloris --script-args http-slowloris.runforever=true``
**Testing brute force attacks**
NSE is really fascinating -- it contains scripts for everything you can imagine. See the next three examples of BFA against WordPress, MSSQL, and FTP server:
``nmap -sV --script http-wordpress-brute --script-args 'userdb=users.txt,passdb=passwds.txt,http-wordpress-brute.hostname=domain.xyz, http-wordpress-brute.threads=3,brute.firstonly=true' 192.168.1.105``
**WordPress brute force attack:**
``nmap -p 1433 --script ms-sql-brute --script-args userdb=customuser.txt,passdb=custompass.txt 192.168.1.105``
**Brute force attack against MS-SQL:**
``nmap -p 1433 --script ms-sql-brute --script-args userdb=customuser.txt,passdb=custompass.txt 192.168.1.105``
**FTP brute force attack:**
``nmap --script ftp-brute -p 21 192.168.1.105``
**Detecting malware infections on remote hosts**
Nmap is able to detect malware and backdoors by running extensive tests on a few popular OS services like Identd, Proftpd, Vsftpd, IRC, SMB, and SMTP. It also has a module to check for popular malware signs inside remote servers and integrates Google’s Safe Browsing and VirusTotal databases as well.
A common malware scan can be performed by using:
``nmap -sV --script=http-malware-host 192.168.1.105``
Or using Google’s Malware check:
``nmap -p80 --script http-google-malware infectedsite.xyz``
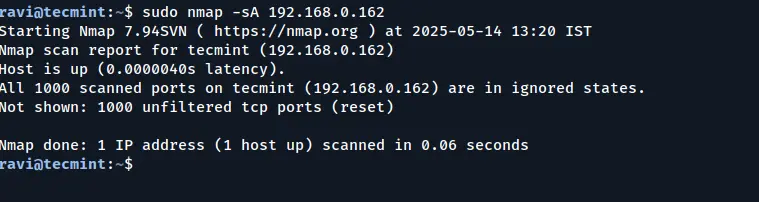
**Scan a Host to Detect a Firewall**
The `-sA` option instructs Nmap to use an **Acknowledgment Scan** to identify filtering devices that may be in place. This type of scan sends packets with the **ACK** flag set and analyzes the response to determine if the host is behind a firewall or using packet filtering.
``nmap -sA 192.168.0.162``
**Detecting Firewalls Using Nmap**
You can scan a host to determine whether it is protected by a firewall or packet filtering software by bypassing the host’s ping checks.
The `-PN` (no ping) option skips the host discovery phase, assuming the host is up and directly scanning it, even if it is behind a firewall that might block ICMP (ping) requests.
``nmap -PN 192.168.0.162``
**Finding Live Hosts When ICMP Is Blocked**
In some cases, remote hosts are protected by firewalls that block standard [ICMP ping requests](https://www.tecmint.com/ping-command/ "Ping Your Network") (such as those used in a typical ping scan with `-PE`).
When **ICMP** is filtered, Nmap’s default host discovery may fail to detect whether a system is up. To work around this, you can use **TCP SYN** `(-PS)` or **TCP ACK** `(-PA)` probes to perform host discovery using TCP packets instead of ICMP.
Example: Using #TCPSYN Probes
``nmap -PS 192.168.0.101``
Example: Using #TCPACK Probes
``nmap -PA 192.168.0.101``
You can also specify the port number(s) to use with these options:
``nmap -PS22,80,443 192.168.0.101``
``nmap -PA22,80,443 192.168.0.101``
**Perform a Stealthy Scan with Nmap to prevent being logged by #ids #intrusiondetectionsystem like #pfsense **
The `-sS` option initiates a TCP SYN scan, commonly referred to as a “**stealth scan**“; such a scan is called stealthy because it doesn’t complete the full TCP handshake, making it less likely to be logged by the target system’s intrusion detection systems (IDS):
``nmap -sS 192.168.0.101``
**Scanning Commonly Used Ports with TCP Connect Scan**
You can use option `-sT` to check for the most commonly used TCP ports on a target host, which is often used when SYN scans are not permitted (e.g., when not running as root), as it completes the full TCP handshake with each port.
``nmap -sT 192.168.0.101``
**Performing a TCP Null Scan to Evade Firewall Detection**
The `-sN` option initiates a TCP Null scan, which sends TCP packets with no flags set (i.e., none of #SYN, #FIN, #RST, #PSH, #ACK, or #URG), which is non-standard and can confuse poorly configured #firewall or intrusion detection systems ( #IDS).
The goal of this technique is to bypass standard filtering mechanisms and analyze how the target system responds to ambiguous packets.
``nmap -sN 192.168.0.101``
Use grep in Windows to find all Apple Devices:
DOS: ``nmap –sP 192.168.178.0/24 | findstr /c:"Apple"``
PowerShell: ``nmap –sP 192.168.178.0/24 | Select-String "Apple"``
Scan 192.168.178.0/24 network for open ports 80 and 442 on TCP (IS A FULL OPEN SCAN, Intrusion detection systems on firewall might see you doing this)
``nmap -sT -p 80,443 192.168.178.0/24``
The above is a 3 way handshake (FULL OPEN SCAN)
Met
```
nmap -sT -p 80 192.168.2.0/24 --open | grep "Nmap scan report"
```
krijg je een overzicht van alle ipadressen in je netwerk met poort 80 open
---
** STEPS TO SCAN YOUR OWN NETWORK FOR VULNERABLE HOSTS**
( Check if you have rights to write to the directory scans. The scans below will write some files in the directory scans)
Baseline: find live hosts
ARP/ICMP host discovery (no port scan)
``sudo nmap -sn -PR 192.168.2.0/24 -oA scans/00-live``
Quick inventory of top TCP ports
`sudo nmap -T4 -F --open 192.168.2.0/24 -oA scans/10-fast`
Top 1000 TCP ports with service/version and basic scripts (good default)
`sudo nmap -T4 -sS -sV -sC --open 192.168.2.0/24 -oA scans/20-tcp-default`
Full TCP sweep (all 65k)
``sudo nmap -T4 -sS -p- --open 192.168.2.0/24 -oA scans/30-tcp-all``
Follow-up: fingerprint only the open ports found
``sudo nmap -T4 -sV -O --version-light -iL scans/30-tcp-all.gnmap -oA scans/31-tcp-fingerprint``
Targeted UDP (slow; focus on common ports)
Top 25 UDP ports (DNS, mDNS, SSDP, SNMP, etc.)
``sudo nmap -T4 -sU --top-ports 25 --open 192.168.2.0/24 -oA scans/40-udp-top25``
Deeper UDP if needed
``sudo nmap -T4 -sU --top-ports 100 --open 192.168.2.0/24 -oA scans/41-udp-top100``
“Safe” vulnerability/script sweep on discovered services
Broad safe checks (won’t exploit; still probe-heavy)
``sudo nmap -T4 --script "default,safe,vuln and not intrusive" -sS -sV --open 192.168.2.0/24 -oA scans/50-nse-safe``
( In Windows, the above command, the Windows Firewall might ask for permission ;-) )
( The command above might give better results on #linux or #mac As #Windows does not have adequate raw #Socket support )
Common service spot-checks
Web devices
Titles, server headers, robots, weak TLS ciphers on common web ports
```
sudo nmap -T4 -p 80,443,8080,8443,10443,32400,9000 --open \
--script http-title,http-server-header,http-robots.txt,ssl-enum-ciphers \
192.168.2.0/24 -oA scans/60-web
```
SMB/Windows shares
```
sudo nmap -T4 -p 139,445 --open \
--script smb-os-discovery,smb-enum-shares,smb-enum-users,smb2-security-mode \
192.168.2.0/24 -oA scans/61-smb
```
SSH hardening
```
sudo nmap -T4 -p 22 --open --script ssh2-enum-algos,ssh-hostkey \
192.168.2.0/24 -oA scans/62-ssh
```
``sudo nmap -T4 -p 22 --open --script ssh2-enum-algos,ssh-hostkey \ 192.168.2.0/24 -oA scans/62-ssh``
DNS / mDNS / LLMNR
```
sudo nmap -T4 -sU -p 53,5353 --open --script dns-recursion,mdns-discovery \
192.168.2.0/24 -oA scans/63-dns-mdns
```
UPnP / SSDP / IoT discovery
``sudo nmap -T4 -sU -p 1900 --open --script upnp-info 192.168.2.0/24 -oA scans/64-upnp``
```
sudo nmap -T4 -sU -p 1900 --open --script upnp-info 192.168.2.0/24 -oA scans/64-upnp
```
RTSP cameras
``sudo nmap -T4 -p 554 --open -sS -sV --script rtsp-url-brute 192.168.2.0/24 -oA scans/65-rtsp``
Only scan live hosts from the discovery step
Build a clean target list from the -sn run and rescan only up hosts
``grep "Status: Up" scans/00-live.gnmap | awk '{print $2}' > live.txt``
``sudo nmap -T4 -sS -sV -sC --open -iL live.txt -oA scans/70-live-tcp``
Noise control / rate hints (use sparingly)
Cap max parallelism on flaky IoT, or push a minimum rate on a quiet LAN
``sudo nmap -sS -sV --min-rate 200 --max-retries 2 --defeat-rst-ratelimit -iL live.txt -oA scans/71-tuned``
Output hygiene and diffs
Always write all formats; keep dated directories per run
``sudo nmap -T4 -sS -sV --open 192.168.2.0/24 -oA scans/$(date +%F)-baseline``
Compare last two runs (example using XML diff via xsltproc+xmldiff or plain grep on .gnmap)``
Quick “what changed since last run” one-liner
New services since yesterday’s baseline (example)
``comm -13 <(grep "/open/" scans/2025-10-21-baseline.gnmap | sort) \ <(grep "/open/" scans/2025-10-22-baseline.gnmap | sort)``
Triage checklist after scans
- Unexpected open ports: close on host firewalls or disable the service.
- Default creds on web/RTSP/UPnP/SMB: change immediately.
- Outdated services flagged by -sV/ssl-enum-ciphers: patch or retire.
- Exposed management ports (22/3389/5900/9200/9300/5672/15672): restrict to admin IPs or move to VPN.
Run everything from a single “baseline” pass if you want minimal friction
``sudo nmap -sn -PR 192.168.2.0/24 -oA scans/00-live grep "Status: Up" scans/00-live.gnmap | awk '{print $2}' > live.txt``
``sudo nmap -T4 -sS -sV -sC --open -iL live.txt -oA scans/BASE-tcp
``sudo nmap -T4 -sU --top-ports 25 --open -iL live.txt -oA scans/BASE-udp``
``sudo nmap -T4 --script "default,safe,vuln and not intrusive" -iL live.txt -oA scans/BASE-nse``
Note on “intrusive” NSE: avoid categories intrusive, dos, brute on production-like devices at home.
---
**FULL TCP CONNECT:**
1. #SYN Are you there ipadres on Port ...?)
2. #SYN / ACK #synack ( ipadres says "Yup, im here on port ... )
3. #ACK (OK lets talk!)
(With [[WIRESHARK]] you can actually see this proces)
There is a step 4 called an RST. The end of the conversation.
#HALFOPEN SCAN:
``nmap -sS -p 80,443 192.168.178.0/24``
(The above is a STEALTH (or HALF OPEN or SYN SCAN) scan. NOT seen by Intrusion detection systems on firewalls)
The SYN or HALF OPEN scan only does a SYN (Are you there <ipadres> on Port <port>?)
And then nmap sends an RST
``nmap -sT 192.168.178.1`` Scans the first 1000 ports on a host.
``nmap -O 192.168.178.1`` Gives you open ports and the possbile os on the host.
``nmap -A 192.168.178.1`` Same as above but even more!
``nmap -sS -D 192.168.178.232 192.168.178.1``
Scans the host in stealth mode, but the -D sends it from your ipadres (decoy) and from 192.168.178.232
So you are confusing people to find you.
``nmap --script vuln 192.168.178.1``
(this runs al the online nmap scripts in the category 'vuln' to check a host for vulnerabilities)
More here: Nmap Scripting Engine - an overview | ScienceDirect Topics
Intense scan:
``nmap -T4 -A -v -D 192.168.178.145``
Intense scan on all ports:
``nmap -p 1-65535 -T4 -A -v -D 192.168.178.145``
UDP scan:
``nmap -sS -sU -T4 -A -v -D 192.168.178.134``
A Simple Guide to Nmap Usage :
What is Nmap? its short For Network Mapper. It is a free port scanner, released under GNU GPL. Written by Fyodor and with contributions from around the world. It is simple fast and very effective port scanners. It has gone under lots of changes and it is certainly the best one with more and more features added. Recent Addtion is Version Scanning which is very crusial against networks. It is the Port Scanner OF Choice. Infact Administrator's, Hackers Crackers, Script Kiddies :P, and many more use it well it is released under GPL and was first written on linux. And a bit shocking thing about is that even microsoft has included it in its auditing tools list and recommends using nmap for scans. But a great tihng about Nmap is that lots of people have also put effort to port it to other platforms like Windows, BSD, MAC OS and it is sucessful so you can run it on any platform. isnt that fantastic. ? yeah it is. It supports many types of scans and diferent types of flags are used and results are also very brief and easy to interpret. Infact Its a Port Scanner Of Choice. And Millions Of them use it and let me tell you try and i am sure you will also become and Nmap Geek within sometime. Well now let me start Off With its Uses:
Nmap Supports Different Types Of Scans, Enumerated Below:
TCP Connect Scan : This is the simplest form of scanning. It connects to every open port on the target machine and lists the open ports, the idea behind this kind of scanning is simple if the port on the target machine is open and accepting connections the Connect() will succed and if the port is not listening it is considered as closed. For every unix user with less priviliges this is the default scanning option. It can be very usefull as it is fast as parellel scanning option can be used with TCP connect Scan. But this type of scanning has its own demerits like it can be easily detected and filtered, it also shows up lots of connection logs.
An example of this is:
``nmap –sT 192.168.0.1``
TCP SYN Scan : This type of scanning is also called as half open scanning, as a full TCP connection is not made to the target port on target machine. In this type of Scan first a SYN packet is send to the port which indicates the port as if a real connection is going to be established and if the port is open and listening it sends back a SYN|ACK which is the indication that the port is open and if we get the RST back with means that the port is not listening and it is closed and if we get SYN|ACK back we immediately send a RST packet back which closes down the connection. This type of scanning has an advantage that only a few systems monitor and log this type pof scan attempts. And a Demerit of this scanning technique is that you need to be root to form SYN packets.
An example of this is:
``nmap –sS 192.168.0.1``
TCP FIN Xmus and Null scans : Sometimes when it is not just enough to use SYN scans as it can be detected by packet filters when SYN packets are send to unlikely ports. And that’s why FIN and Xmus and Null all these scans are able to by pass these type of filtering, in the technique when FIN packet is send to a open port the open port ignores the packet and a closed port immidiately send back a RST packet which tells nmap which port is open and which is close, But this type of scanning has its own merits and demerits as it is not effective against Microsoft Platform, and infact when ever a FIN packet is send to any port it replys with RST, but this can be used to discover that this system is Microsoft Based. On the other hand it works fine with *nix Boxes.
An example of this is:
``nmap –sF 192.168.0.1`` This is FIN Scan
``nmap –sX 192.168.0.1`` This is Xmus Scan
``nmap –sN 192.168.0.1`` This is Null Scan.
Ping Scan : It is sometimes when you want to know which of the systems are up, and this is the most likely scan method to be used to determine systems which are up. This is done by sending ICMP echo packets to all the hosts specified and all those hosts that respond to these packets are up. But sometimes ICMP echo packets are blocked and so it fails in picking up systems that are alive. But infact our nmap is much more smarter in this respect and has a option which send TCP Ack packet to the target system by default this port is set to “80”, and if the system responds with a RST packet, this is an indication that the system is up and the third technique is a SYN packet is send and awating a RST or SYN | Ack packet which indicates the system is up.
An example of this is:
``nmap –sP 192.168.0.1-255`` Ping Scan
``nmap –PT80 192.168.0.1`` TCP Ping Scan.
UDP Scan : This type of Scanning is used to determine which UDP ports are open on the target host. In this type of scanning 0 byte udp packet it send to all the specified ports on the taget machine and if we get ICMP unreacheable then the port is assumed to be closed or else it is considered as open. But to its demerit is that sometimes ISP’s often block these ports and so it sometimes throws incorrect results that the ports are open but infact it is not, so you need to be a bit more fortunate about these results.
An example of this is:
``nmap –sU 192.168.0.1``
Version Detection Scan : Recent Addition to Nmap is version detection, which determines the service running and the version number of the daemon running. It is really very useful as it shows up the versions and which can show the old and vulnerable daemons and this is where vulnerability scanners are used but nmap has done it by just Version detection technique, if you are really an nmap geek I doubt you need vulnerability scanners, in this type of scan a service fingerprint is made from the daemon which is compared to nmap’s database of fingerprints and when it matchs it is sure that what service is running.
An example of this is:
``nmap –sV 192.168.0.1``
Protocol Scan : This technique is used to know which IP protocols are supported on the targer host. This is done by sending raw ip packets to the host without any header of protocol and it is send to all the protocols on the target host.nmap probes for 256 protocol types and it is infact time consuming but it is useful somewhere or the other.
An example of this is:
``nmap –sO 192.168.0.1``
Ack Scan : This type of Scanning is used to map out firewall rulesets.It can detemine that the firewall is stateful or just a packe filter that blocks incoming SYN packets. In this type of scan an Ack packet is send to the port and if it replies with an RST it means it is unfiltered and it is open and if no reply is returned it is classified as filtered.
An example of this is:
``nmap –sA 192.168.0.1``
List Scan : This used to generate a list of IP addresses with out actually pinging or scanning them and also a DNS resolution is performed in this type of scan.
An example of this is:
``nmap –sL yahoo.com``
RPC Scan : This type of scan uses a number of portscanning techniques, it finds all the TCP and UDP ports found and floods them with SunRPC program with Null commands to determine if it is a RPC service or not, it also catches up version number also.
An example for this is:
``nmap –sR 192.168.0.1``
Idle Scan : This type of scan is truly blind Scan. Which means that no packet is send from your own ip address. Instead another host is used which is often called as a Zombie with is used to scan the target machine and determine the open ports on the target machine, this is done by predecting the sequence numbers of the zombie host and used that host to scan our target, and if the target machine checks the ip of the scanning party the ip of the Zombie machine will show up. But it is best suited to use this technique at late nights when the zombie is idle to get the best results. There is a very nice paper written on Idle scanning, you can get it from securityfocus, I don’t remember the link but u can search for it, and there is also an exclusive paper on idle scanning with nmap which u can get at insecure.org This type of scan also helps us to map out the trust releationship between hosts. With is crucial for Spoofing attacks.
An example of this is:
``nmap –sI zombie.yahoo.com mail.yahoo.com``
Window Scan : This type of scan is very similar to Ack Scanning. It is use to map out open closed ports, filtered unfiltered ports due to anomaly in TCP window size reporting by each different operating system. Majority of *Nix Operating systems are vulnerable.
An example of this is:
``nmap –sW 192.168.0.1``
Different Types of Flags used in Scanning:
-P0 :-If this flag is used it is an indication that Pinging the host is prohibited and during scanning the host Pinging is disabled. This is useful in many cases as some of the servers ignore icmp echo requests, so the host is scanned without discovering it with ping. With this TCP Ack Scan can also be used here like this –PT80.
-PT :-This flag is used to determine which hosts are up. This is used when icmp echo reply packets are blocked. A TCP Ack packet is send to the target network and if the host reply’s with RST it is up or else it is down.
-PS :-This flag is uses SYN packets instead of Ack packets, but its limitations for packet constructing is only for root users. All the hosts that respond with RST or SYN|ACK the hosts are up and if nothing, then its assumed to be down.
-O :-This flag is used to identify the target operating system. This is done by comparing the already stored fingerprint database of nmap with that of the fingerprints genreated by the host. This technique also calculates the uptime of the computer, and also used to determine the TCP Sequence predectability
-f :-This flag is used to evade intrusion detection systems and packet filtering systems and by pass all the scans with SYN , FIN , NULL, XMUS options. Packets are broken into tiny packets which are hard to be detected by IDS and Packet filters to detect.
-v :-This flag indicates verbose output. It means that it will print all information whats going on during the scan, And it can used to times to get more information.
-p :-This flag is used specify the custom port numbers you want to scan.different ports can be seperated using commas, “,”.
An example for this is:
``nmap –sT –p 21,23,80,139,6000 192.168.0.1``
-F :-This flag is used for Fast scanning. When this flag is used the only ports specified in the nmap services file will be scanned. And this is what makes the scan very fast.
-M :-This flag is used to specify maximum number of sockets to be used for parallel scanning.
-T :-This flag is used to specify the timing policy for the scan. This type of scanning can be used to evade Intrusion detection systems and it can also be used to make the Intrusion detection systems to start shouting :D. There are 5 options of timings.
Paranoid:- This type is very slow and is very handy to evade IDS.
Sneaky :- This is a bit similar but waits only 15 seconds between sending packets.
Polite :- This type helps to ease the load on the network.
Nornal :- This type of scanning is the nornal scanning behaviour.
Aggressive :- This type is used to make the scan a bit more fast.
Insane :- This type is the most quickest scan, I triggers IDS’s.
Examples Of Scanning:
``nmap –sS -v 192.168.0.1``
``nmap –sT –v 192.168.0.1``
``nmap –sS –sV -v 192.168.0.1``
``nmap –sT –sV –v 192.168.0.1``
``nmap –sT –sV –v –P0 192.168.0.1``
``nmap –sP –v 192.168.0.1-255``
``nmap –PT80 –vv 192.168.0.1-255``
``nmap –sF –vv 192.168.0.1``
``nmap –sO –sV 192.168.0.1``
``nmap –sI –P0 zombie.myhost.com yourhost.com``
``nmap –sT –sV –p 21,23,79,80 192.168.0.1``
``nmap –sT –sV –T Paranoid 192.168.0.1``
``nmap –sT –P0 –T Insane –M10 192.168.0.1``
``nmap –sT –T5 –M1000 192.168.0.1``
Hide yourself at hacking
We use proxy chaining
When hacking it is safer to use proxyservers as a "middleman"
BUT, proxy servers could have logs to, so you are leaving traces of the
things you are doing...
What to do then?
Maybe use more proxyservers? Hop to proxy1, to proxy2, to proxy3,.....
It makes it a bit safer to use this chain of proxies to attack someone.
Chances are less that the police will check the logs of all the chained proxies,
to catch you.
It is, however, NOT foolproof!! But, here is how it works:
#proxychain #proxychains
apt install proxychains
In /etc/proxychains.conf, you can configure proxychains
(If it is not there, use locate proxychains to find the conf file.)
There are three type of chains mentioned in the /etc/proxychains.conf file.
Dynamic, strict and random
Strict is uncommented. Comment it (you know, with #), because we are going to use dynamic.
So, uncommented it by removing the #
The order we put in the proxies in the conf file, will be the order (chain) in which they
will be used. It is called dynamic, because if one of the proxies is unreachable, it will
skip this one the chain and continue to use the next in the chain.
Random means.... Bingo! Randomly use one in the list defined....
Further on in the conf file we can configure the proxies.
There are some Examples in the configfile defined:
socks5 <ipadres> port <username> <password>
etc. etc.
You have socks4,socks5,http,
ports 1080, usually for socks and 8080 for http
preferably prevent using http. https or socks5. Prefer sock5 above socks4.
DO NOT DISABLE THE OPTION PROXY_DNS IN THE CONF FILE!!!
Because it will resolve ipadresses throught the proxy. Otherwise it will not and
make you traceable....
Example add ;-)
socks4 125.26.99.228 44052
http 3.236.52.219 8888
You can find many many more FREE proxies online here: https://spys.one/en/
Some proxies must be chained in a specific order, sometimes.
For example to access proxy3, you must have access to proxy2, but in order to access
proxy1.
So it might be a chaing like This
https <proxy1> 8888
https <proxy2> 8888
https <proxy3> 8888
In some cases, you can access private ipadresses (at the end of the chain)
via a certain order of proxies!
USE IPADRESSES in those chains!!!!!!
So, if you want to use it. Preceed you hackingcommand with proxychains <YourFavoriteHackingCommand>
Example (not hacking though, but just to test it out):
proxychains firefox www.google.com
If you go back to you commandprompt, you will some nice stuff happening ;-)
Hacking Example
proxychains nmap -sT -P 80,443 <ipadres>
The example above, will perform an nmap, without leaving easy to find traces...
You can also perform an nmap on a complete network to find webservers (or whatever)
Use nmap with -sT and -Pn
-sT to use use tcp connect
-Pn to not first ping, but connect anyway.
FULL TCP CONNECT:
1. #SYN Are you there ipadres on Port ...?)
2. #SYN / ACK #synack ( ipadres says "Yup, im here on port ... )
3. #ACK (OK lets talk!)
(With [[WIRESHARK]] you can actually see this proces)
There is a step 4 called an RST. The end of the conversation.
#HALFOPEN SCAN:
``nmap -sS -p 80,443 192.168.178.0/24``
(The above is a STEALTH (or HALF OPEN or SYN SCAN) scan. NOT seen by Intrusion detection systems on firewalls)
The SYN or HALF OPEN scan only does a SYN (Are you there <ipadres> on Port <port>?)
And then nmap sends an RST
``nmap -sT 192.168.178.1`` Scans the first 1000 ports on a host.
``nmap -O 192.168.178.1`` Gives you open ports and the possbile os on the host.
``nmap -A 192.168.178.1`` Same as above but even more!
``nmap -sS -D 192.168.178.232 192.168.178.1``
Scans the host in stealth mode, but the -D sends it from your ipadres (decoy) and from 192.168.178.232
So you are confusing people to find you.
``nmap --script vuln 192.168.178.1``
(this runs al the online nmap scripts in the category 'vuln' to check a host for vulnerabilities)
More here: Nmap Scripting Engine - an overview | ScienceDirect Topics
Intense scan:
``nmap -T4 -A -v -D 192.168.178.145``
Intense scan on all ports:
``nmap -p 1-65535 -T4 -A -v -D 192.168.178.145``
UDP scan:
``nmap -sS -sU -T4 -A -v -D 192.168.178.134``
A Simple Guide to Nmap Usage :
What is Nmap? its short For Network Mapper. It is a free port scanner, released under GNU GPL. Written by Fyodor and with contributions from around the world. It is simple fast and very effective port scanners. It has gone under lots of changes and it is certainly the best one with more and more features added. Recent Addtion is Version Scanning which is very crusial against networks. It is the Port Scanner OF Choice. Infact Administrator's, Hackers Crackers, Script Kiddies :P, and many more use it well it is released under GPL and was first written on linux. And a bit shocking thing about is that even microsoft has included it in its auditing tools list and recommends using nmap for scans. But a great tihng about Nmap is that lots of people have also put effort to port it to other platforms like Windows, BSD, MAC OS and it is sucessful so you can run it on any platform. isnt that fantastic. ? yeah it is. It supports many types of scans and diferent types of flags are used and results are also very brief and easy to interpret. Infact Its a Port Scanner Of Choice. And Millions Of them use it and let me tell you try and i am sure you will also become and Nmap Geek within sometime. Well now let me start Off With its Uses:
Nmap Supports Different Types Of Scans, Enumerated Below:
TCP Connect Scan : This is the simplest form of scanning. It connects to every open port on the target machine and lists the open ports, the idea behind this kind of scanning is simple if the port on the target machine is open and accepting connections the Connect() will succed and if the port is not listening it is considered as closed. For every unix user with less priviliges this is the default scanning option. It can be very usefull as it is fast as parellel scanning option can be used with TCP connect Scan. But this type of scanning has its own demerits like it can be easily detected and filtered, it also shows up lots of connection logs.
An example of this is:
``nmap –sT 192.168.0.1``
TCP SYN Scan : This type of scanning is also called as half open scanning, as a full TCP connection is not made to the target port on target machine. In this type of Scan first a SYN packet is send to the port which indicates the port as if a real connection is going to be established and if the port is open and listening it sends back a SYN|ACK which is the indication that the port is open and if we get the RST back with means that the port is not listening and it is closed and if we get SYN|ACK back we immediately send a RST packet back which closes down the connection. This type of scanning has an advantage that only a few systems monitor and log this type pof scan attempts. And a Demerit of this scanning technique is that you need to be root to form SYN packets.
An example of this is:
``nmap –sS 192.168.0.1``
TCP FIN Xmus and Null scans : Sometimes when it is not just enough to use SYN scans as it can be detected by packet filters when SYN packets are send to unlikely ports. And that’s why FIN and Xmus and Null all these scans are able to by pass these type of filtering, in the technique when FIN packet is send to a open port the open port ignores the packet and a closed port immidiately send back a RST packet which tells nmap which port is open and which is close, But this type of scanning has its own merits and demerits as it is not effective against Microsoft Platform, and infact when ever a FIN packet is send to any port it replys with RST, but this can be used to discover that this system is Microsoft Based. On the other hand it works fine with *nix Boxes.
An example of this is:
``nmap –sF 192.168.0.1`` This is FIN Scan
``nmap –sX 192.168.0.1`` This is Xmus Scan
``nmap –sN 192.168.0.1`` This is Null Scan.
Ping Scan : It is sometimes when you want to know which of the systems are up, and this is the most likely scan method to be used to determine systems which are up. This is done by sending ICMP echo packets to all the hosts specified and all those hosts that respond to these packets are up. But sometimes ICMP echo packets are blocked and so it fails in picking up systems that are alive. But infact our nmap is much more smarter in this respect and has a option which send TCP Ack packet to the target system by default this port is set to “80”, and if the system responds with a RST packet, this is an indication that the system is up and the third technique is a SYN packet is send and awating a RST or SYN | Ack packet which indicates the system is up.
An example of this is:
``nmap –sP 192.168.0.1-255`` Ping Scan
``nmap –PT80 192.168.0.1`` TCP Ping Scan.
UDP Scan : This type of Scanning is used to determine which UDP ports are open on the target host. In this type of scanning 0 byte udp packet it send to all the specified ports on the taget machine and if we get ICMP unreacheable then the port is assumed to be closed or else it is considered as open. But to its demerit is that sometimes ISP’s often block these ports and so it sometimes throws incorrect results that the ports are open but infact it is not, so you need to be a bit more fortunate about these results.
An example of this is:
``nmap –sU 192.168.0.1``
Version Detection Scan : Recent Addition to Nmap is version detection, which determines the service running and the version number of the daemon running. It is really very useful as it shows up the versions and which can show the old and vulnerable daemons and this is where vulnerability scanners are used but nmap has done it by just Version detection technique, if you are really an nmap geek I doubt you need vulnerability scanners, in this type of scan a service fingerprint is made from the daemon which is compared to nmap’s database of fingerprints and when it matchs it is sure that what service is running.
An example of this is:
``nmap –sV 192.168.0.1``
Protocol Scan : This technique is used to know which IP protocols are supported on the targer host. This is done by sending raw ip packets to the host without any header of protocol and it is send to all the protocols on the target host.nmap probes for 256 protocol types and it is infact time consuming but it is useful somewhere or the other.
An example of this is:
``nmap –sO 192.168.0.1``
Ack Scan : This type of Scanning is used to map out firewall rulesets.It can detemine that the firewall is stateful or just a packe filter that blocks incoming SYN packets. In this type of scan an Ack packet is send to the port and if it replies with an RST it means it is unfiltered and it is open and if no reply is returned it is classified as filtered.
An example of this is:
``nmap –sA 192.168.0.1``
List Scan : This used to generate a list of IP addresses with out actually pinging or scanning them and also a DNS resolution is performed in this type of scan.
An example of this is:
``nmap –sL yahoo.com``
RPC Scan : This type of scan uses a number of portscanning techniques, it finds all the TCP and UDP ports found and floods them with SunRPC program with Null commands to determine if it is a RPC service or not, it also catches up version number also.
An example for this is:
``nmap –sR 192.168.0.1``
Idle Scan : This type of scan is truly blind Scan. Which means that no packet is send from your own ip address. Instead another host is used which is often called as a Zombie with is used to scan the target machine and determine the open ports on the target machine, this is done by predecting the sequence numbers of the zombie host and used that host to scan our target, and if the target machine checks the ip of the scanning party the ip of the Zombie machine will show up. But it is best suited to use this technique at late nights when the zombie is idle to get the best results. There is a very nice paper written on Idle scanning, you can get it from securityfocus, I don’t remember the link but u can search for it, and there is also an exclusive paper on idle scanning with nmap which u can get at insecure.org This type of scan also helps us to map out the trust releationship between hosts. With is crucial for Spoofing attacks.
An example of this is:
``nmap –sI zombie.yahoo.com mail.yahoo.com``
Window Scan : This type of scan is very similar to Ack Scanning. It is use to map out open closed ports, filtered unfiltered ports due to anomaly in TCP window size reporting by each different operating system. Majority of *Nix Operating systems are vulnerable.
An example of this is:
``nmap –sW 192.168.0.1``
Different Types of Flags used in Scanning:
-P0 :-If this flag is used it is an indication that Pinging the host is prohibited and during scanning the host Pinging is disabled. This is useful in many cases as some of the servers ignore icmp echo requests, so the host is scanned without discovering it with ping. With this TCP Ack Scan can also be used here like this –PT80.
-PT :-This flag is used to determine which hosts are up. This is used when icmp echo reply packets are blocked. A TCP Ack packet is send to the target network and if the host reply’s with RST it is up or else it is down.
-PS :-This flag is uses SYN packets instead of Ack packets, but its limitations for packet constructing is only for root users. All the hosts that respond with RST or SYN|ACK the hosts are up and if nothing, then its assumed to be down.
-O :-This flag is used to identify the target operating system. This is done by comparing the already stored fingerprint database of nmap with that of the fingerprints genreated by the host. This technique also calculates the uptime of the computer, and also used to determine the TCP Sequence predectability
-f :-This flag is used to evade intrusion detection systems and packet filtering systems and by pass all the scans with SYN , FIN , NULL, XMUS options. Packets are broken into tiny packets which are hard to be detected by IDS and Packet filters to detect.
-v :-This flag indicates verbose output. It means that it will print all information whats going on during the scan, And it can used to times to get more information.
-p :-This flag is used specify the custom port numbers you want to scan.different ports can be seperated using commas, “,”.
An example for this is:
``nmap –sT –p 21,23,80,139,6000 192.168.0.1``
-F :-This flag is used for Fast scanning. When this flag is used the only ports specified in the nmap services file will be scanned. And this is what makes the scan very fast.
-M :-This flag is used to specify maximum number of sockets to be used for parallel scanning.
-T :-This flag is used to specify the timing policy for the scan. This type of scanning can be used to evade Intrusion detection systems and it can also be used to make the Intrusion detection systems to start shouting :D. There are 5 options of timings.
Paranoid:- This type is very slow and is very handy to evade IDS.
Sneaky :- This is a bit similar but waits only 15 seconds between sending packets.
Polite :- This type helps to ease the load on the network.
Nornal :- This type of scanning is the nornal scanning behaviour.
Aggressive :- This type is used to make the scan a bit more fast.
Insane :- This type is the most quickest scan, I triggers IDS’s.
Examples Of Scanning:
``nmap –sS -v 192.168.0.1``
``nmap –sT –v 192.168.0.1``
``nmap –sS –sV -v 192.168.0.1``
``nmap –sT –sV –v 192.168.0.1``
``nmap –sT –sV –v –P0 192.168.0.1``
``nmap –sP –v 192.168.0.1-255``
``nmap –PT80 –vv 192.168.0.1-255``
``nmap –sF –vv 192.168.0.1``
``nmap –sO –sV 192.168.0.1``
``nmap –sI –P0 zombie.myhost.com yourhost.com``
``nmap –sT –sV –p 21,23,79,80 192.168.0.1``
``nmap –sT –sV –T Paranoid 192.168.0.1``
``nmap –sT –P0 –T Insane –M10 192.168.0.1``
``nmap –sT –T5 –M1000 192.168.0.1``
Hide yourself at hacking
We use proxy chaining
When hacking it is safer to use proxyservers as a "middleman"
BUT, proxy servers could have logs to, so you are leaving traces of the
things you are doing...
What to do then?
Maybe use more proxyservers? Hop to proxy1, to proxy2, to proxy3,.....
It makes it a bit safer to use this chain of proxies to attack someone.
Chances are less that the police will check the logs of all the chained proxies,
to catch you.
It is, however, NOT foolproof!! But, here is how it works:
#proxychain #proxychains
``apt install proxychains``
In /etc/proxychains.conf, you can configure proxychains
(If it is not there, use locate proxychains to find the conf file.)
There are three type of chains mentioned in the /etc/proxychains.conf file.
Dynamic, strict and random
Strict is uncommented. Comment it (you know, with #), because we are going to use dynamic.
So, uncommented it by removing the #
The order we put in the proxies in the conf file, will be the order (chain) in which they
will be used. It is called dynamic, because if one of the proxies is unreachable, it will
skip this one the chain and continue to use the next in the chain.
Random means.... Bingo! Randomly use one in the list defined....
Further on in the conf file we can configure the proxies.
There are some Examples in the configfile defined:
socks5 ipadres port username password
etc. etc.
You have socks4,socks5,http,
ports 1080, usually for socks and 8080 for http
preferably prevent using http. https or socks5. Prefer sock5 above socks4.
DO NOT DISABLE THE OPTION PROXY_DNS IN THE CONF FILE!!!
Because it will resolve ipadresses throught the proxy. Otherwise it will not and
make you traceable....
Example add ;-)
socks4 125.26.99.228 44052
http 3.236.52.219 8888
You can find many many more FREE proxies online here: https://spys.one/en/
Some proxies must be chained in a specific order, sometimes.
For example to access proxy3, you must have access to proxy2, but in order to access
proxy1.
So it might be a chaing like This
https proxy1 8888
https proxy2 8888
https proxy3 8888
In some cases, you can access private ipadresses (at the end of the chain)
via a certain order of proxies!
USE IPADRESSES in those chains!!!!!!
So, if you want to use it. Preceed you hackingcommand with proxychains YourFavoriteHackingCommand
Example (not hacking though, but just to test it out):
proxychains firefox www.google.com
If you go back to you commandprompt, you will some nice stuff happening ;-)
Hacking Example
proxychains nmap -sT -P 80,443 ipadres
The example above, will perform an nmap, without leaving easy to find traces...
You can also perform an nmap on a complete network to find webservers (or whatever)
Use nmap with -sT and -Pn
-sT to use use tcp connect
-Pn to not first ping, but connect anyway.
Zie ook [[Install All Kali Tools on Ubuntu]]