After completing this tutorial, you will know how to set up and deploy a standalone web application with Google Apps Script, use Bootstrap for styling, read data from a Google Sheet, and dynamically populate the web app using JavaScript.
## 1. Google Apps Script set up
### 1.1 Set up Apps Script Project
- Navigate to [Google Apps Script](https://script.google.com/).
- Click **New Project** to create a new project. This will create a stand-alone application.
> [!NOTE]
> Google Apps Script projects may also be 'containerized' within a Google Sheet, Doc, Slides or other Google Workplace product. To create a containerized project, select **Apps Script** under the **Extensions** menu in a Sheet, Doc, Slides, or Form.
- Name the project.
### 1.2 Create the doGet Function
- Replace all existing content in the `Code.gs` file with the code shown below:
```JavaScript title="Code.gs"
function doGet(e) {
return HtmlService.createTemplateFromFile('index').evaluate();
};
```
### 1.3 Create HTML File
- Click the "**+**" next to Files in the left sidebar and select 'HTML'. Name the file `index` (note the file extension `.html` will automatically be added). The name of this file must be the same as the string passed to the `doGet` function, but you may name it however you want.
### 1.4 Include Bootstrap
- Navigate to the Bootstrap [Quick Start Guide](https://getbootstrap.com/docs/5.2/getting-started/introduction/#quick-start).
- Follow the instructions in the Quick Start Guide to populate your `index.html` file and include Bootstrap's JavaScript and CSS. See below for how your `index.html` file should look.
```html title="index.html"
<!doctype html>
<html lang="en">
<head>
<meta charset="utf-8">
<meta name="viewport" content="width=device-width, initial-scale=1">
<title>Bootstrap demo</title>
<link href="https://cdn.jsdelivr.net/npm/
[email protected]/dist/css/bootstrap.min.css" rel="stylesheet" integrity="sha384-rbsA2VBKQhggwzxH7pPCaAqO46MgnOM80zW1RWuH61DGLwZJEdK2Kadq2F9CUG65" crossorigin="anonymous">
</head>
<body>
<h1>Hello, world!</h1>
<script src="https://cdn.jsdelivr.net/npm/
[email protected]/dist/js/bootstrap.bundle.min.js" integrity="sha384-kenU1KFdBIe4zVF0s0G1M5b4hcpxyD9F7jL+jjXkk+Q2h455rYXK/7HAuoJl+0I4" crossorigin="anonymous"></script>
</body>
</html>
```
### 1.6 Deploy the web application
We'll deploy the basic version to confirm that everything is working correctly.
- Save your project by clicking the **Save Project** icon or `Ctrl+s`.
- At the top right of the script project, click **Deploy > New deployment**.
- Next to "Select type," click the Settings icon and select **Web app**.
- Input "Initial Deployment" in the **Description** field.
- Select 'Me' in the **Execute as** field.
- Select 'Only myself' in the **Who has access** field.
- Click **Deploy**.
- Click the URL of the Web app shown in the dialog box that was created to visit the app. You should see a webpage that simply says "Hello, world!".
- Close the web application and return to the script files; close the dialog box if necessary.
You now have a functioning Google Apps Script web application with Bootstrap. Next we'll begin using Bootstrap "containers" for easy styling of our web app.
---
## 2. Bootstrap grid system
> [!Tip]
> While developing your web application, you'll want to be able to easily edit the code, review the draft site, and access documentation. I like to split my screen such that the left half displays the code editor and the right half has either the draft application or the documentation I need (in two or more browser tabs within the same window). You may also want to create a README file to capture notes as you go. Figure out what works best for you. Multiple screens make coding even easier.
### 2.1 Create a container
Bootstrap organizes its grid system within containers. You'll notice when you create a container, the content within the container has more padding from the edges of the screen. After completing this step, notice how the 'Hello, World!' header moves inward once we place it within a container.
- Create a simple container within the body tag of `index.html` by replacing the existing code `<h1>Hello, world!</h1>`:
```HTML title="index.html"
<div class="container"></div>
```
> [!Tip]
> Note how I've opened and closed the `div` tag on the same line. It's best practice to always close the tag first and then insert content so that you don't accumulate multiple unclosed tags, which can be difficult to sort out later.
- Add a row within the container by creating a return (insert your cursor and press **Enter**) just before the closing div tag. The container div will now look like this.
```HTML title="index.html"
<div class="container">
<div class="row"></div>
</div>
```
- Add a single column within the row. This column will span the entire row. While not necessary, we'll get in the habit of specifying both the number of columns (up to 12) to span and the screen size for responsive design.
```HTML title="index.html"
<div class="container">
<div class="row">
<div class="col-sm-12"></div>
</div>
</div>
```
### 2.3 Populate container content
- For this example, we'll add back the header `Hello, world!` and add what's known as a lead paragraph as a subtitle for the page.
```HTML title="index.html"
<div class="container">
<div class="row">
<div class="col-sm-12">
<h1>Hello, world!</h1>
<p class="lead">
This is a lead paragraph. It stands out from regular paragraphs.
</p>
</div>
</div>
</div>
```
- Save your work by clicking the Save icon in the toolbar above the code or with `Ctrl + S`.
### 2.2 Deploy as a Test Deployment
To see changes to our app as we make them, we need to deploy as a Test Deployment.
- At the top right of the script project, click **Deploy > Test deployment**.
- Click the URL in the dialog box to open the test deployment. Refresh the test deployment to see changes after you save changes to the project's code files.
> [!NOTE]
> Learn more about the Grid System on [Bootstrap's official documentation](https://getbootstrap.com/docs/5.2/layout/grid/). Play around with different combinations of containers, rows and columns to get the feel for the grid system. Also, try responsive design by changing the number of columns associated with different screen sizes. You can resize the screen or use the Developer Tools in Chrome (`Ctrl+Shift+I`) to see how the application would look on a tablet or smart phone.
Next, we'll create a Card to practice using a Bootstrap Component in Google Apps Script Bootstrap Components.
---
## 3. Bootstrap card components
### 3.1 Review card component documentation
The first step when using a component is always to review the documentation and understand how to use it and what its capabilities are.
- Navigate to [Bootstrap's Card documentation](https://getbootstrap.com/docs/5.2/components/card/).
- Review the documentation.
### 3.2 Build a simple card
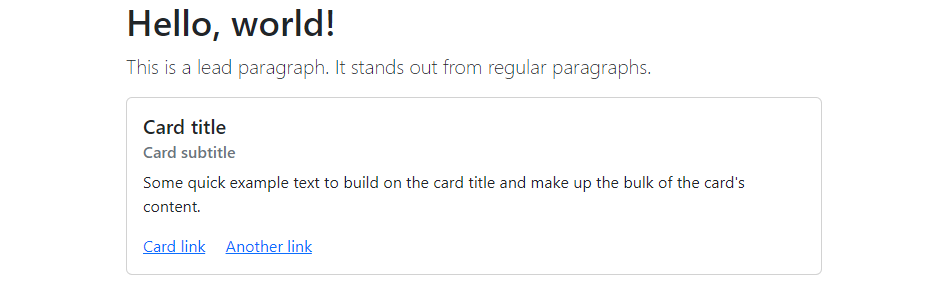
- Copy the relevant code for the card style you want and paste it into your `index.html` file directly below the lead paragraph. For this tutorial, let's use the [**Titles, text, and links**](https://getbootstrap.com/docs/5.2/components/card/#titles-text-and-links) card example.
```HTML title="index.html"
<h1>Hello, world!</h1>
<p class="lead">
This is a lead paragraph. It stands out from regular paragraphs.
</p>
<div class="card">
<div class="card-body">
<h5 class="card-title">Card title</h5>
<h6 class="card-subtitle mb-2 text-muted">Card subtitle</h6>
<p class="card-text">Some quick example text to build on the card title and make up the bulk of the card's content.</p>
<a href="#" class="card-link">Card link</a>
<a href="#" class="card-link">Another link</a>
</div>
</div>
```
- Save the file and reload the test deployment to see the card displayed on the page. It should look like this:
Next we will use the data read from a Google Sheet to populate the content of the Bootstrap card components.
---
## 4. Populating components
### 4.1 Create a container to store the cards
Replace the code that creates the individual card with a container that will store all cards once created from the Google Sheet. Provide this component with an `id` equal to `"datasets"`. The `id` will allow us to find it later when we want to add cards to it.
```HTML title="index.html"
<h1>Hello, world!</h1>
<p class="lead">
This is a lead paragraph. It stands out from regular paragraphs.
</p>
<div class="container" id="datasets"></div>
```
> [!Tip]
> To find the right closing div tag to delete, select any div tag and note that the corresponding opening div tag is highlighted in your code. You want to delete the entire div whose `class` property is equal to `"card"`.
### 4.2 Create a script tag in `index.html`
We're going to use JavaScript to create and populate cards. To include JavaScript in our `index.html` file, we need to create a new script tag. Create a new line just above the closing body tag ( `</body>` ) and add an opening and closing script tag.
```JavaScript title="index.html"
<script>
</script>
```
### 4.3 Insert dummy data
For now, we'll use dummy data to make sure the JavaScript is working as expected.
- In between the opening and closing script tag, paste the following dummy data.
```HTML title="index.html"
<script>
var data = [
['Dataset1', 'Source1', 'Abstract1', 'http://www.example.com/'],
['Dataset2', 'Source2', 'Abstract2', 'http://www.example.com/']
];
</script>
```
### 4.4 Write code to print the data to the console
To get started, let's simply write code that will print each line of the data to the console. The Developer Tools console is a part of your browser that provides additional information to developers. To access it using Chrome, navigate to the test deployment of your web app and use `Ctrl+Shift+I`.
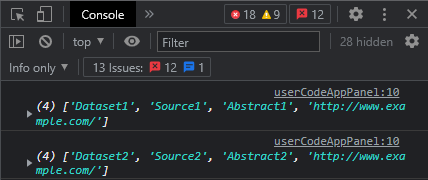
- Write a JavaScript [arrow function](https://developer.mozilla.org/en-US/docs/Web/JavaScript/Reference/Functions/Arrow_functions) to print data to the console.
```HTML title="index.html"
<script>
var data = [
['Dataset1', 'Source1', 'Abstract1', 'http://www.example.com/'],
['Dataset2', 'Source2', 'Abstract2', 'http://www.example.com/']
];
data.forEach(row => {
console.log(row);
});
</script>
```
- Navigate to the test deployment of your web app and use `Ctrl+Shift+I` to open the Developer Tools console. Reload the app. You should see each row of data printed out (you may also see warnings (yellow) and errors (red); ignore those for now).
### 4.5 Write code to create cards
Let's expand our code so that not only does the data print to the console, it is also added to our web application. It's not important to understand how this code works right now, however you will need to understand how the code works as you progress in your learning.
- Expand the code in your script tags such that it looks like this.
```HTML title="index.html"
<script>
var data = [
['Dataset1', 'Source1', 'Abstract1', 'http://www.example.com/'],
['Dataset2', 'Source2', 'Abstract2', 'http://www.example.com/']
];
var cardContainer = document.getElementById('datasets');
data.forEach(row => {
console.log(row);
var card = document.createElement('div');
card.className = 'card';
var cardBody = document.createElement('div');
cardBody.className = 'card-body'
var cardTitle = document.createElement('h5');
cardTitle.innerText = row[0];
cardTitle.className = 'card-title';
var cardSubtitle = document.createElement('h6');
cardSubtitle.innerText = row[1];
cardSubtitle.className = 'card-subtitle mb-2 text-muted';
var cardText = document.createElement('p');
cardText.innerText = row[2];
cardText.className = 'card-text';
var cardLink = document.createElement('a');
cardLink.innerText = 'Get Data';
cardLink.href = row[3];
cardLink.target = "_blank";
cardLink.className = 'card-link';
cardBody.appendChild(cardTitle);
cardBody.appendChild(cardSubtitle);
cardBody.appendChild(cardText);
cardBody.appendChild(cardLink);
card.appendChild(cardBody);
cardContainer.appendChild(card);
});
</script>
```
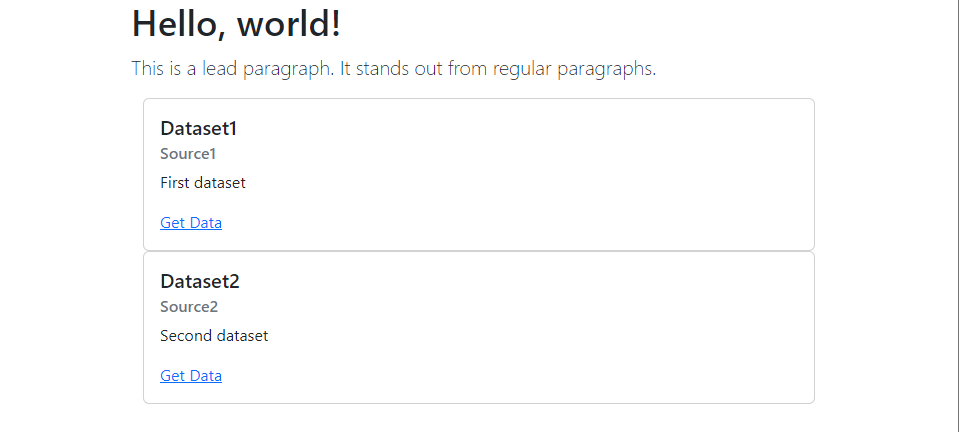
- Save the project and reload the web application to see the changes.
### 4.6 Wrap the code in a function
- Finally, we'll wrap all of this code in a function so we can more easily run the code with our Google Sheets data. Call the function at the end so the code still runs. Refresh the web browser to confirm everything is still working.
```HTML title="index.html"
<script>
var data = [
['Dataset1', 'Source1', 'Abstract1', 'http://www.example.com/'],
['Dataset2', 'Source2', 'Abstract2', 'http://www.example.com/']
];
var cardContainer = document.getElementById('datasets');
function populateCards(data) {
var cardContainer = document.getElementById('datasets');
data.forEach(row => {
console.log(row);
var card = document.createElement('div');
card.className = 'card';
var cardBody = document.createElement('div');
cardBody.className = 'card-body'
var cardTitle = document.createElement('h5');
cardTitle.innerText = row[0];
cardTitle.className = 'card-title';
var cardSubtitle = document.createElement('h6');
cardSubtitle.innerText = row[1];
cardSubtitle.className = 'card-subtitle mb-2 text-muted';
var cardText = document.createElement('p');
cardText.innerText = row[2];
cardText.className = 'card-text';
var cardLink = document.createElement('a');
cardLink.innerText = 'Get Data';
cardLink.href = row[3];
cardLink.target = "_blank";
cardLink.className = 'card-link';
cardBody.appendChild(cardTitle);
cardBody.appendChild(cardSubtitle);
cardBody.appendChild(cardText);
cardBody.appendChild(cardLink);
card.appendChild(cardBody);
cardContainer.appendChild(card);
});
};
populateCards(data);
</script>
```
Next we'll replace our dummy data by reading data directly from a Google Sheet.
---
## 5. Reading data from Google Sheets
### 5.1 Create a Google Sheet
- Create a new Google Sheet and populate it with the dummy data (or data of your choosing). Include headers in your Google Sheet. The data should look something like the below; you can include as many rows as you like.
- Rename the sheet to `data`.

### 5.2 Copy the Google Spreadsheet ID
- Copy the Google Spreadsheet ID from the URL bar for your newly created Google Sheet. It will be located immediately after the `/d/` in the URL, as shown by `{google-sheets-id}` below.
```
https://docs.google.com/spreadsheets/d/{google-sheet-id}/edit
```
- Within the file `Code.gs` in your Apps Script project, create a variable to store the Google Sheet spreadsheet ID and paste the ID.
```JavaScript title="index.html"
const ssid = '15QXeVfDXwESIHVzj9YDn7KarN93qPmwl6g-BWdt5QUw';
```
> [!Tip]
> I like to include these variables at the top of my files so they are easy to change if needed.
### 5.3 Write a function to read the data
- Write the following function to read all data from your spreadsheet in `Code.gs`. Note I use `Logger.log(data)` to write the data to the Google Apps script console; this will help us test our code.
```JavaScript title="index.html"
function getData(){
var ss = SpreadsheetApp.openById(ssid);
var ws = ss.getSheetByName('data');
var data = ws.getRange(1, 1, ws.getLastRow(), ws.getLastColumn()).getValues();
var headers = data.shift();
Logger.log(data);
return data
}
```
- Save the project.
The full `Code.gs` file should now look like this (your google sheet ID will be different).
```JavaScript title="index.html"
const ssid = '15QXeVfDXwESIHVzj9YDn7KarN93qPmwl6g-BWdt5QUw';
function doGet(e) {
return HtmlService.createHtmlOutputFromFile('index');
}
function getData(){
var ss = SpreadsheetApp.openById(ss_id);
var ws = ss.getSheetByName('data');
var data = ws.getRange(1, 1, ws.getLastRow(), ws.getLastColumn()).getValues();
var headers = data.shift();
Logger.log(data);
return data
}
```
### 5.4 Authorize access to Google Drive
- On the toolbar above the code, select the getData function.

- Click **Run**.
- A dialog box prompting you to grant authorization will pop up. Click **Review Permissions**.

- Grant authorization by following the prompts.
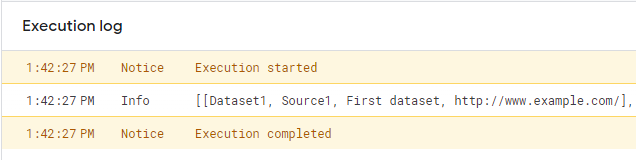
- Click **Run** again to run the function with permissions granted. You should see the data printed to the Log in Google Apps Script.
- The data from the Google Sheet should print out to the Execution Log.
### 5.5 Pass data from Sheets to web application
- Open the `index.html` file.
- Replace the function `populateCards(data)` with the following statement.
```JavaScript title="index.html"
google.script.run.withSuccessHandler(populateCards).getData();
```
This statement runs the `getData()` function in the `Code.gs` file and passes the data, which was returned by that function, to your function `populateCards`. Save the project and reload the web application to test it.
### 5.6 Load cards on document load
Finally, wrap the above statement in an [event listener](https://developer.mozilla.org/en-US/docs/Web/API/Document/DOMContentLoaded_event) so that the function only runs once the webpage content is loaded. This ensures that the card container is available to the `populateCards` function before the cards are loaded.
```JavaScript title="index.html"
document.addEventListener('DOMContentLoaded', function(){
google.script.run.withSuccessHandler(populateCards).getData();
});
```
- Save the project and reload the web application to test it.
Next, we'll re-organize our project to a more modular structure that will enable better long-term maintenance.
---
## 6. Project Organization
### 6.1 Write an `include` function
- Navigate to your `Code.gs` file and write this function below the existing code.
```JavaScript title = "Code.gs"
function include(filename){
return HtmlService.createHtmlOutputFromFile(filename).getContent();
}
```
### 6.2 Create a file to store JavaScript
- Click the "+" next to Files and select 'HTML'. Name the file `JavaScript` (note the file extension `.html` will automatically be added). Delete any existing code in the file and cut and paste everything in the script tags created instep 4 into this file.
> [!NOTE]
> Everything must be between `script` tags in this file.
### 6.3 Include the script file in your file `index.html`
- Add this code after the last script tag in the `index.html` file, but before the closing body tag.
```HTML title="index.html"
<!-- Include custom JavaScript -->
<?!= include("JavaScript"); ?>
```
### 6.4 (Optional) Create a file to store styles
In web development, styles (which change how your app looks) are controlled using cascading style sheets (CSS). Create a file
- Click the "+" next to Files and select 'HTML'. Name the file `StyleSheet` (note the file extension `.html` will automatically be added).
- Add an opening and closing style tag. All content must be included within the style tags.
```html title="StyleSheet.html"
<style>
</style>
```
- Include the style sheet file in your file `index.html`. Add this code after the last style tag within the headers tags.
```html title="index.html"
<!-- Include custom Styles -->
<?!= include("StyleSheet"); ?>
```
You can use this file to adjust styles and change how the web app looks.
Next we'll deploy this version from the test environment to the web.
---
## 7. Deploy web app
It is best practice to update the Active deployment rather than deploy multiple versions of the same application. This will keep the link to your project the same, so your users can find it again after you update it. The Apps Script editor maintains a version history that will allow you to roll back changes if you need to.
### 7.1 Manage existing deployments
- Save your project by clicking the **Save Project** icon or `Ctrl+s`.
- At the top right of the script project, click **Deploy > Manage deployments**.
- Click the pencil icon to Edit the active deployment.

- Under **Version**, select "New version".
- Update the description to a meaningful but concise statement about what you changed (this will help you roll back changes if needed to the correct version in the future).
- You can also change the **Execute as** and **Who has access** settings. Learn more about these settings in the [Google Apps Script Developer Guide](https://developers.google.com/apps-script/guides/web).
- Click **Deploy**.
---
Congratulations! You've created a standalone web application that reads data from a Google Sheet and populates Bootstrap components. Here are some additional helpful references and tutorials to continue learning.
> [!Example] Additional Resources
> - [Google AppScript Web Apps guide](https://developers.google.com/apps-script/guides/web)
> - [Code with Curt - Create Bootstrap Web App Form on Google Sheets using Google Apps Sript (YouTube)](https://www.youtube.com/watch?v=c1AQH4UOmiI)
> - [Excel Google Sheets- Learn Google Spreadsheets - Web Apps Playlists (YouTube)](https://www.youtube.com/c/LearnGoogleSpreadsheets/playlists?view=50&sort=dd&shelf_id=6)
## Full code
See below for full code.
### Code.gs
```JavaScript title="Code.gs"
const ssid = '15QXeVfDXwESIHVzj9YDn7KarN93qPmwl6g-BWdt5QUw';
function doGet(e) {
return HtmlService.createTemplateFromFile('index').evaluate();
}
function include(filename){
return HtmlService.createHtmlOutputFromFile(filename).getContent();
}
function getData(){
var ss = SpreadsheetApp.openById(ssid);
var ws = ss.getSheetByName('data');
var data = ws.getRange(1, 1, ws.getLastRow(), ws.getLastColumn()).getValues();
var headers = data.shift();
Logger.log(data);
return data
}
function include(filename){
return HtmlService.createHtmlOutputFromFile(filename).getContent();
}
```
### index.html
```HTML title="index.html"
<!doctype html>
<html lang="en">
<head>
<meta charset="utf-8">
<meta name="viewport" content="width=device-width, initial-scale=1">
<title>Bootstrap demo</title>
<link href="https://cdn.jsdelivr.net/npm/
[email protected]/dist/css/bootstrap.min.css" rel="stylesheet" integrity="sha384-rbsA2VBKQhggwzxH7pPCaAqO46MgnOM80zW1RWuH61DGLwZJEdK2Kadq2F9CUG65" crossorigin="anonymous">
<?!= include("StyleSheet"); ?>
</head>
<body>
<div class="container">
<div class="row">
<div class="col-sm-12">
<h1>Hello, world!</h1>
<p class="lead">
This is a lead paragraph. It stands out from regular paragraphs.
</p>
<div class="container" id="datasets"></div>
</div>
</div>
</div>
<script src="https://cdn.jsdelivr.net/npm/
[email protected]/dist/js/bootstrap.bundle.min.js" integrity="sha384-kenU1KFdBIe4zVF0s0G1M5b4hcpxyD9F7jL+jjXkk+Q2h455rYXK/7HAuoJl+0I4" crossorigin="anonymous"></script>
<?!= include("JavaScript"); ?>
</body>
</html>
```
### JavaScript.html
```html title="JavaScript.html"
<script>
var data = [
['Dataset1', 'Source1', 'Abstract1', 'http://www.example.com/'],
['Dataset2', 'Source2', 'Abstract2', 'http://www.example.com/']
];
var cardContainer = document.getElementById('datasets');
function populateCards(data) {
var cardContainer = document.getElementById('datasets');
data.forEach(row => {
console.log(row);
var card = document.createElement('div');
card.className = 'card';
var cardBody = document.createElement('div');
cardBody.className = 'card-body'
var cardTitle = document.createElement('h5');
cardTitle.innerText = row[0];
cardTitle.className = 'card-title';
var cardSubtitle = document.createElement('h6');
cardSubtitle.innerText = row[1];
cardSubtitle.className = 'card-subtitle mb-2 text-muted';
var cardText = document.createElement('p');
cardText.innerText = row[2];
cardText.className = 'card-text';
var cardLink = document.createElement('a');
cardLink.innerText = 'Get Data';
cardLink.href = row[3];
cardLink.target = "_blank";
cardLink.className = 'card-link';
cardBody.appendChild(cardTitle);
cardBody.appendChild(cardSubtitle);
cardBody.appendChild(cardText);
cardBody.appendChild(cardLink);
card.appendChild(cardBody);
cardContainer.appendChild(card);
});
};
document.addEventListener('DOMContentLoaded', function(){
google.script.run.withSuccessHandler(populateCards).getData();
});
</script>
```
### StyleSheet.html
*This is empty and not required but you can update with CSS to customize the look of your app.*
```HTML title="StyleSheet.html"
<style>
</style>
```